Post by harley on Aug 30, 2007 9:25:28 GMT -5
Over the past couple of days since I posted some good hot weather groups, using my barrel cooler, enough people have emailed and PM'd for details and clarification that I decided to pull it all together with pictures for anyone who wants to build a unit.
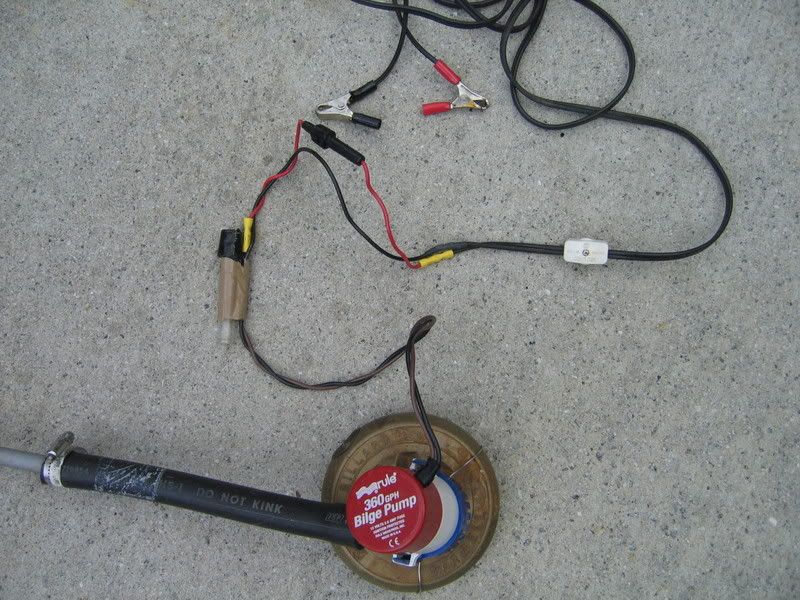
The first figure shows the weighted bilge pump (any capacity will do; the pumps are obtained from boating stores or BassPro) and all electrical connections: Inline fuse, inline switch, alligator clips. Using 16 gauge lamp wire will allow you to make your line as long as you need in order to attach the alligator clips to your car battery.
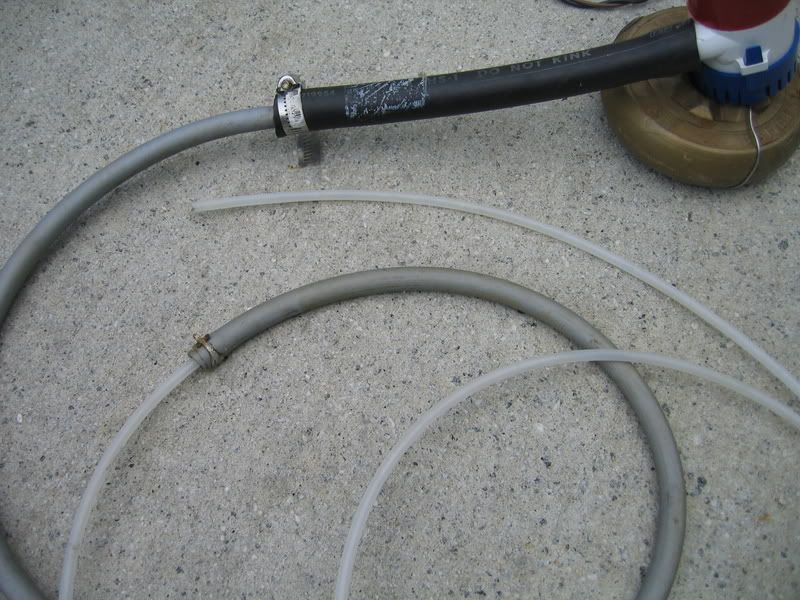
The next picture illustrates a series of diminishing diameter hoses from the pump output to the 1/4" plastic line. I used scraps I already had, but any combination of hoses can be obtained from Home Depot in the plumbing department.
The 1/4" plastic line is the tubing used in refrigerator ice makers. Home Depot has it in various lengths. Make your total line long enough to reach from your pump (in an ice chest) to the breech plug in your rifle barrel when the rifle is mounted on your shooting stand.
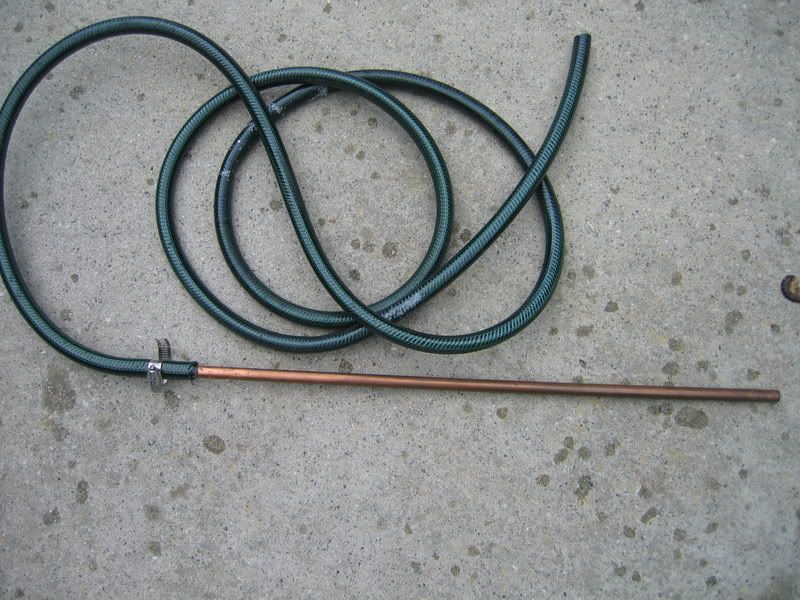
The outer, return hose and copper barrel probe are pictured below. The copper tubing, nominally 3/8" O.D. (actually 1/2") is available from McMaster-Carr Supply Company, www.mcmaster.com. Part number is 5175K43. This is a five foot length; cut it to a length that will extend from your breech plug plus four inches beyond the end of the muzzle. Plug one end of the copper. A 7/16" copper slug will solder perfectly; or, you can use a good marine sealer. I like "PL", sold in the caulk section of the paint department at Home Depot.
You may or may not have to sand the copper to fit it into the barrel. I did sand mine (the package and the tubing were damaged in transit); I forced a dowel into one end of my cut tubing, then chucked the dowel into a hand drill that was clamped in a vise. Use a coarse sandpaper to reduce the copper, then a few passes with a finer paper to remove most of the surface abrasions.
Depending on the size of the hose you may have to wrap a few turns of electrical tape around the rod before clamping it into the hose. First, slide the rod all the way into the rifle barrel, then slide the other end of the rod into the hose, leaving an inch of bare copper between the muzzle and the hose. This will later allow you to touch the bare spot with your finger to verify whether or not cold water is running into the pipe.
Into the outer hose drill as small a hole as will still allow insertion of the 1/4" line. Where along the hose length you do this is not critical, but the closer to the pump you drill, the more jacket insulation you provide for the 1/4" line. Insert the 1/4" line and run it all the way to the closed end of the copper tube, then pull it back at least 1/4" to allow water to exit freely from the 1/4" line.
You may then duct tape the small line to the outer hose to cover and seal the puncture you made. There is no pressure and little water volume on the return, so it won't significantly leak.

Cut the free end of the outer hose to a length that allows it to be submerged in your ice chest. Then, tape the two hoses together at intervals along their length in order to keep things neat.

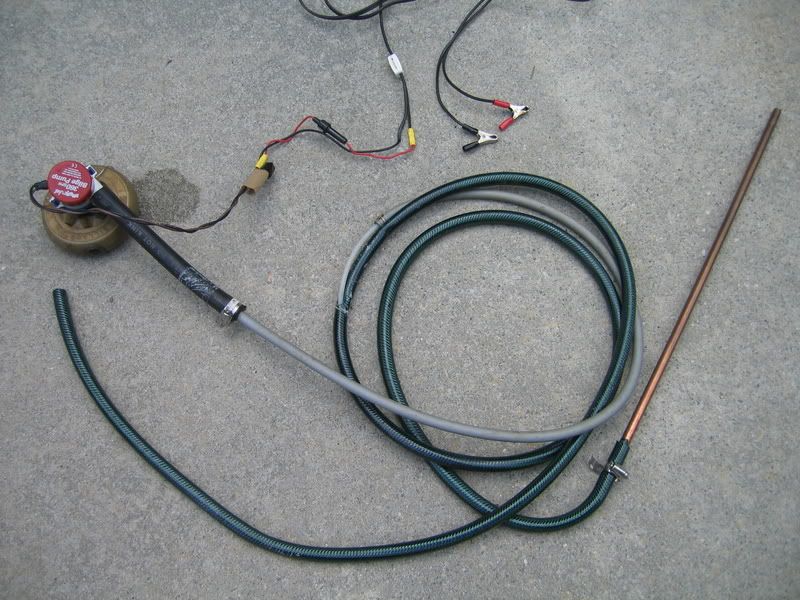
The complete assembly is pictured below, minus the final taping. I also taped into the electric line a small plastic vial containing a spare fuse for the pump.
In use, follow this procedure:
1. Wipe down the copper tube to be certain there is no moisture or abrasive material on it.
2. Insert the tube fully into the barrel.
3. Activate the pump, keeping your finger on the bare copper at the muzzle to confirm that cold water is running up into the line. (It didn't happen to me, but you might have to prime the line by holding it horizontal and on a level with the pump in order to draw the initial water into the line.)
4. Cool until the barrel feels chilled at the breech end, which takes longer than the muzzle because of the breech plug and associated metal. This should take one minute, more or less.
5. Turn off the pump and quickly remove the rod. I think this aids in preventing moisture from forming within the barrel. You will notice a lot of condensation on the outside of the barrel as it cools. That's okay, of course.
6. Run one dry patch through the barrel. This will confirm there is no moisture within, and also helps to maintain the same level of residue from shot to shot.
On a 90+ degree day, I cooled one minute between the first and second shot, then two minutes between the second and third shot.
The cooler can be adapted for use with center fire rifles (30 caliber up) by using only a 1/4" line that is long enough to extend from the pump, through the barrel, out the breech and back into the ice chest.
If you build a cooler for yourself, I'd like your feedback.
Thanks.
The first figure shows the weighted bilge pump (any capacity will do; the pumps are obtained from boating stores or BassPro) and all electrical connections: Inline fuse, inline switch, alligator clips. Using 16 gauge lamp wire will allow you to make your line as long as you need in order to attach the alligator clips to your car battery.
The next picture illustrates a series of diminishing diameter hoses from the pump output to the 1/4" plastic line. I used scraps I already had, but any combination of hoses can be obtained from Home Depot in the plumbing department.
The 1/4" plastic line is the tubing used in refrigerator ice makers. Home Depot has it in various lengths. Make your total line long enough to reach from your pump (in an ice chest) to the breech plug in your rifle barrel when the rifle is mounted on your shooting stand.
The outer, return hose and copper barrel probe are pictured below. The copper tubing, nominally 3/8" O.D. (actually 1/2") is available from McMaster-Carr Supply Company, www.mcmaster.com. Part number is 5175K43. This is a five foot length; cut it to a length that will extend from your breech plug plus four inches beyond the end of the muzzle. Plug one end of the copper. A 7/16" copper slug will solder perfectly; or, you can use a good marine sealer. I like "PL", sold in the caulk section of the paint department at Home Depot.
You may or may not have to sand the copper to fit it into the barrel. I did sand mine (the package and the tubing were damaged in transit); I forced a dowel into one end of my cut tubing, then chucked the dowel into a hand drill that was clamped in a vise. Use a coarse sandpaper to reduce the copper, then a few passes with a finer paper to remove most of the surface abrasions.
Depending on the size of the hose you may have to wrap a few turns of electrical tape around the rod before clamping it into the hose. First, slide the rod all the way into the rifle barrel, then slide the other end of the rod into the hose, leaving an inch of bare copper between the muzzle and the hose. This will later allow you to touch the bare spot with your finger to verify whether or not cold water is running into the pipe.
Into the outer hose drill as small a hole as will still allow insertion of the 1/4" line. Where along the hose length you do this is not critical, but the closer to the pump you drill, the more jacket insulation you provide for the 1/4" line. Insert the 1/4" line and run it all the way to the closed end of the copper tube, then pull it back at least 1/4" to allow water to exit freely from the 1/4" line.
You may then duct tape the small line to the outer hose to cover and seal the puncture you made. There is no pressure and little water volume on the return, so it won't significantly leak.
Cut the free end of the outer hose to a length that allows it to be submerged in your ice chest. Then, tape the two hoses together at intervals along their length in order to keep things neat.
The complete assembly is pictured below, minus the final taping. I also taped into the electric line a small plastic vial containing a spare fuse for the pump.
In use, follow this procedure:
1. Wipe down the copper tube to be certain there is no moisture or abrasive material on it.
2. Insert the tube fully into the barrel.
3. Activate the pump, keeping your finger on the bare copper at the muzzle to confirm that cold water is running up into the line. (It didn't happen to me, but you might have to prime the line by holding it horizontal and on a level with the pump in order to draw the initial water into the line.)
4. Cool until the barrel feels chilled at the breech end, which takes longer than the muzzle because of the breech plug and associated metal. This should take one minute, more or less.
5. Turn off the pump and quickly remove the rod. I think this aids in preventing moisture from forming within the barrel. You will notice a lot of condensation on the outside of the barrel as it cools. That's okay, of course.
6. Run one dry patch through the barrel. This will confirm there is no moisture within, and also helps to maintain the same level of residue from shot to shot.
On a 90+ degree day, I cooled one minute between the first and second shot, then two minutes between the second and third shot.
The cooler can be adapted for use with center fire rifles (30 caliber up) by using only a 1/4" line that is long enough to extend from the pump, through the barrel, out the breech and back into the ice chest.
If you build a cooler for yourself, I'd like your feedback.
Thanks.


 I can't even haul my ML stuff in two boxes plus gun case now.......