Post by rossman40 on Oct 28, 2008 0:40:15 GMT -5
The pre-Accutrigger 10ML-II bolt
With people having misfires they sometimes blame the bolt. The most common bolt problem is not having the bolt handle all the way down. What happens then is the firing pin will not have enough travel. Another problem I have seen at least with pre-AccuTrigger Savages is trigger adjustment. If you take out all the backlash the sear can contact the trigger and slow the sear down, look at the trigger just behind the point where the sear engages and see if there is any scrapes. If so, increase backlash and see if it corrects the problem. You have to remember that the Savage firing pin is fairly light so you want nothing holding it back, even oil or grit in the bolt head.
Savage is not a fan of the shooter disassembling the bolt and does not even mention it in the owner’s manual. While not real hard I would encourage anyone that thinks that this may be too hard for them to take it to a competent gunsmith.
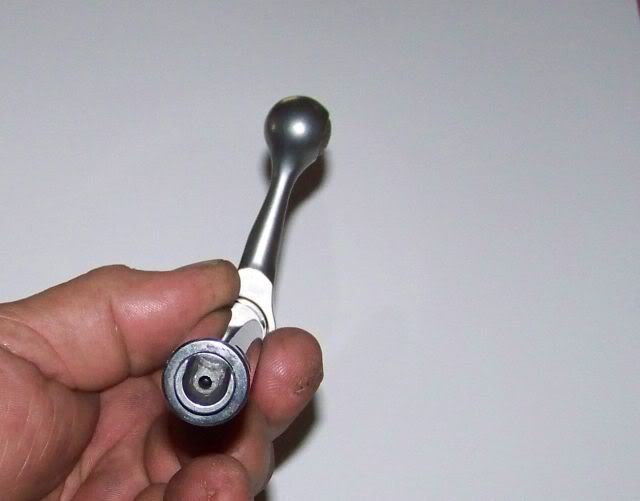
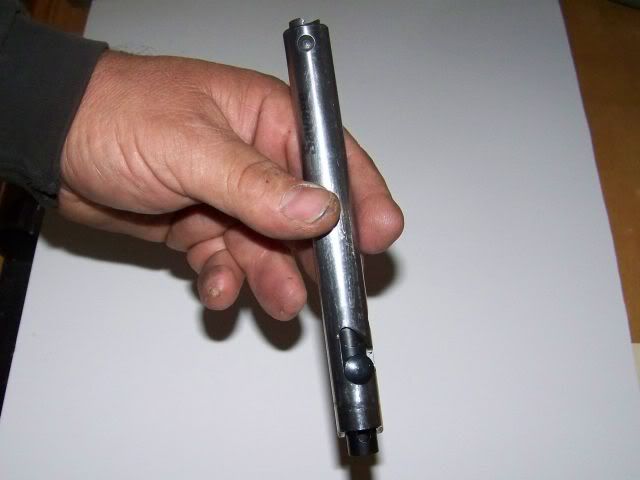
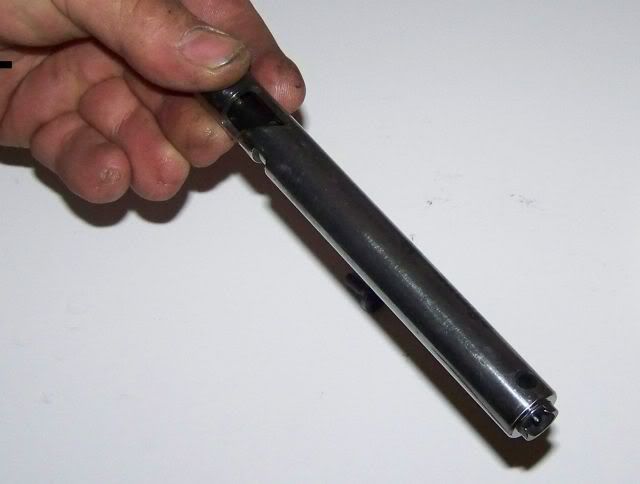
We will start off looking at the bolt. Notice that the notch on the bottom of the bolt handle lines up with the cocking piece pin when cocked. Also just below the cocking piece pin is the slot where the action screw is when the bolt is closed.
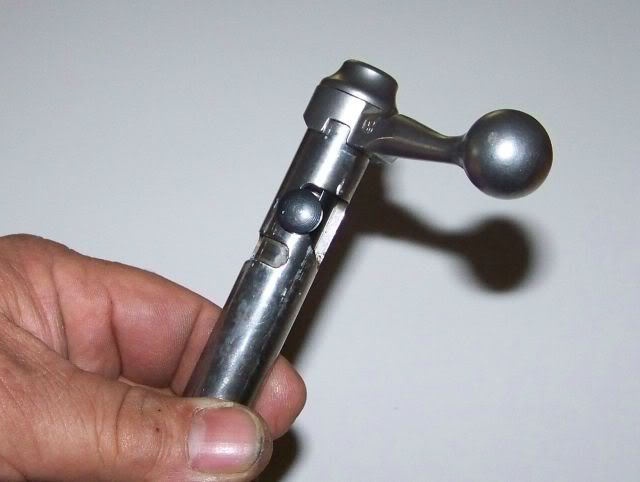
The open end of the horseshoe of the bolt head basically lines up with the bolt handle.
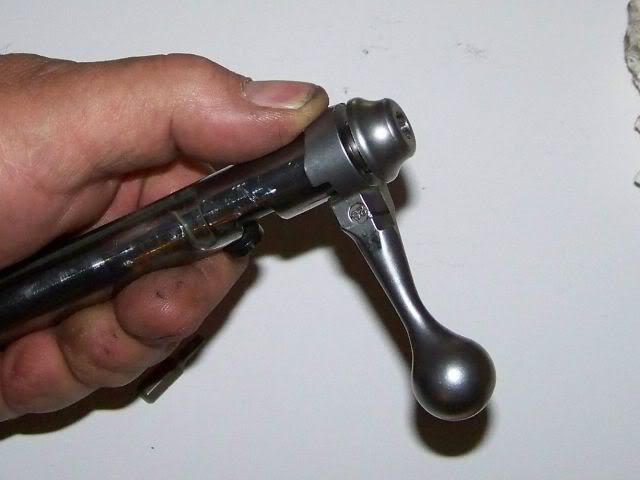
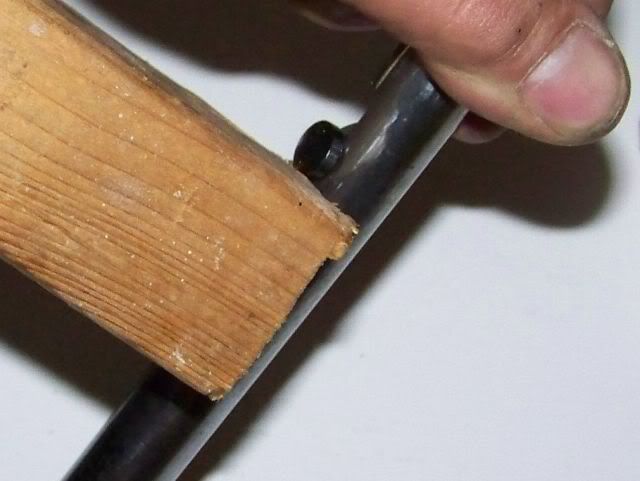
To check firing pin protrusion and/or start dis-assembly you have to de-cock the firing pin. If you have a strong thumb you can push the cocking piece pin off the notch. Make sure you finger is below the slot or you may get a good pinch. If your thumb isn't strong enough you can push it off the notch using a block of wood or plastic.
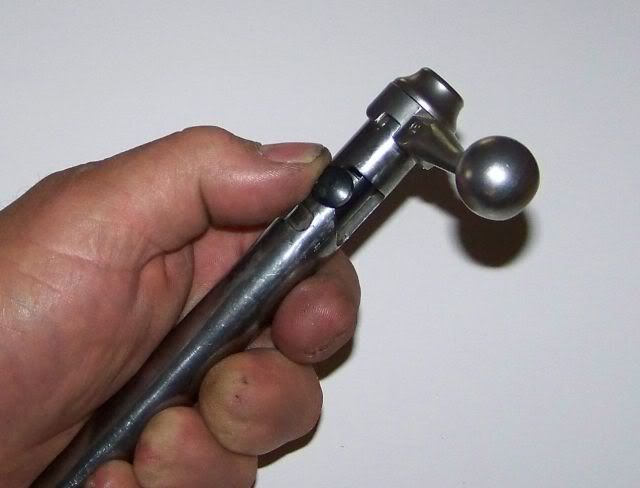
With the firing pin de-cocked we can check firing pin protrusion. You want between .050 and .070", a US dime is .050". I like to have mine on the heavy end but do not go beyond .100" as you may pierce primers. The firing pin protrusion here is at the extreme end. A dimple in the primer should be at least .040".
Lets say we have to dis-assemble the bolt, we need a 1/4" allen and it is best to put the bolt handle loosely in a vice. I have seen guys bend and break the cocking piece pin trying to loosen the bolt assembly screw while the bolt is in the action. You also do not want to tighten the vice up on the bolt body as you may deform it. At the factory I think the same gorilla they have tighten the barrel nuts also tightens the bolt assembly screw. Once we get it loose the rest is easy.
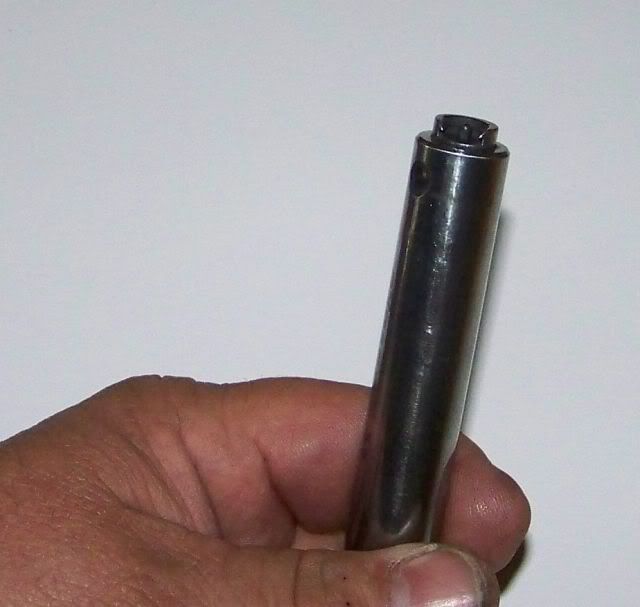
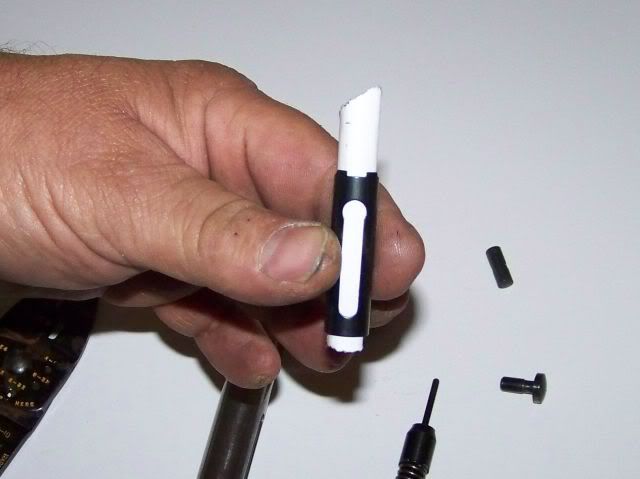
Give the bolt body a shake and the sheet metal cocking piece sleeve will be back or can be pulled back more to allow the cocking piece pin to be removed. The cocking piece sleeve has a slot with a larger diameter cut-out at the end of the slot that allows you to remove the cocking piece pin, the sleeve has to be all the way to the rear for the pin to come out.
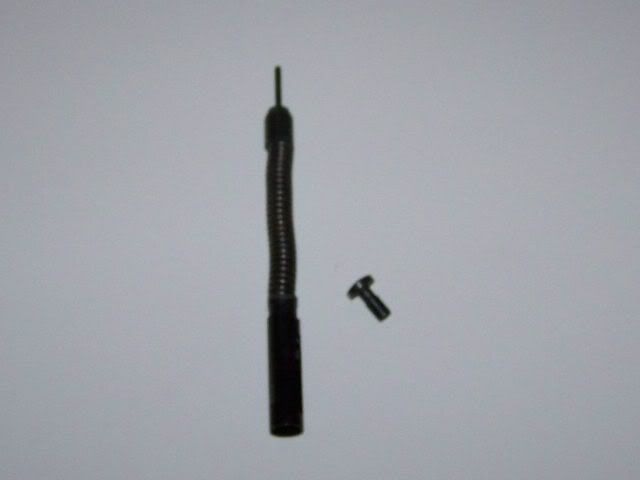
The firing pin assembly can now be removed. The cocking piece sleeve is still on the firing pin assembly.
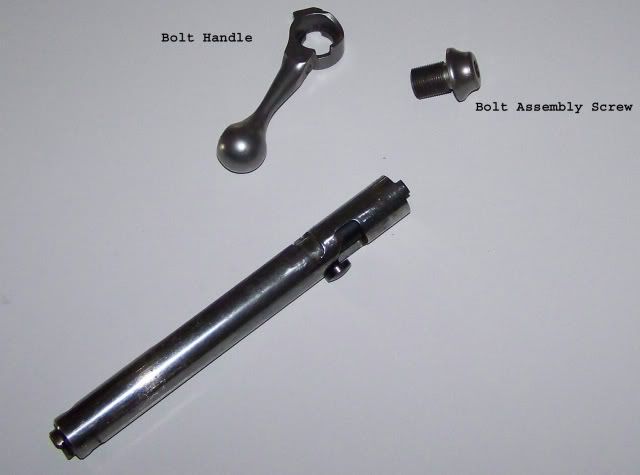
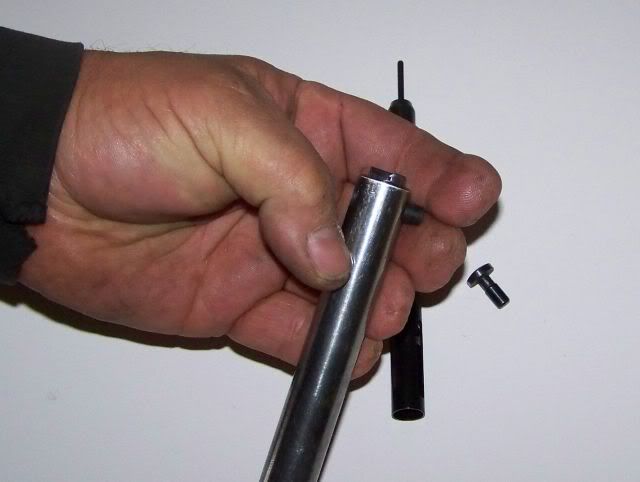
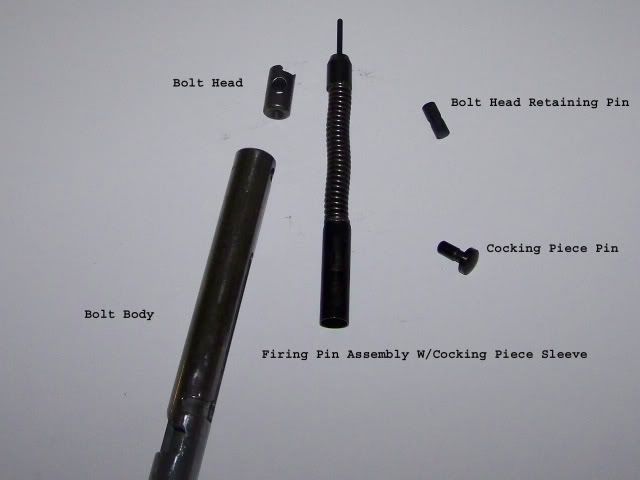
The bolt head retaining pin should come out with a tap or light push and then the bolt head will come out.
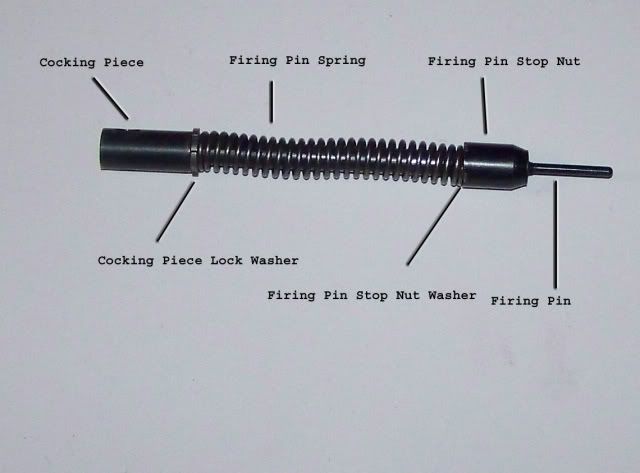
Now it is clean up time, get rid of all grit, sludge and GI gold. You just want to wipe down the parts with a light oil to prevent rust. If I plan on hunting in nasty freezing weather my favorite lube is a graphite based lube for lock cylinders called "Lock-Ease". Avoid heavy oils and grease. Now the firing pin assembly.
Now that everything is clean you can check the firing pin protrusion without re-assembly by just putting the bolt head on the firing pin.
If you have to adjust the best way I found is to use a pair of wire strippers. I have one pair that is perfect that is for coax but those are at a jobsite. You want to catch the spring pretty close to the stop nut (half the distance shown in the photo), you have to watch as the firing pin is "D" shaped in that area and if you catch it to low on the flat it will stop you from pushing down. Push down on the spring and the lock washer should drop down also. Turn the stop nut clockwise to increase firing pin protrusion. Make sure the four flats on the lock washer goes back into the four slots in the stop nut, the lock washer will not turn on the firing pin. I have a jig block made that lets me do it one handed but it is hiding somewhere.
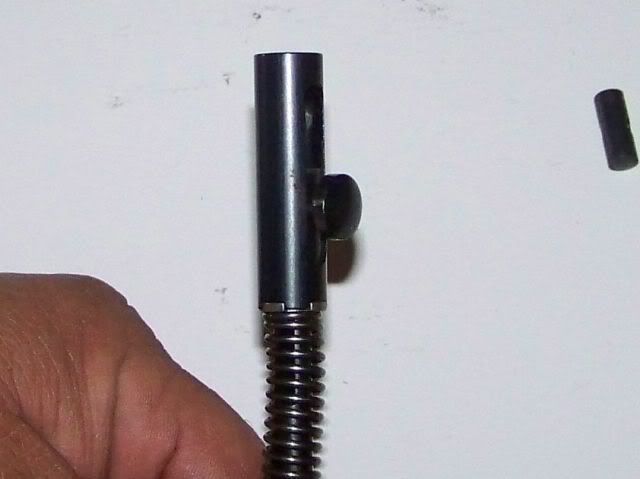
Once you have your firing pin protrusion set and the lock washer is in place we have to look at the other end. In the pre-AccuTrigger days one thing that Savage shooters did was to relieve some firing pin spring compression to ease up on sear pressure, NOT ADVISED. What happens is you have just a few threads of the firing pin (which is “D” shaped on this end also) catching in the cocking piece and those can strip dropping the firing pin and possibly causing an accidental discharge. Another one of the most common mis-adjustments is that when the bolt is de-cocked or fired, instead of the firing pin assembly coming to rest against the bolt head, it is instead being held by the cocking piece pin. I have seen with centerfires after a thousand rounds or more (aggravated by dry fire trigger practice) this causes problems due to the cocking piece pin taking the impact instead of the firing pin stop nut against the bolt head. I have seen bent/cracked/broke cocking piece pins, the cocking piece hole and the threads where it screws on to the firing pin with extreme wear, even the bolt body mushroomed. It is just a "point of inspection" during maintenance to de-cock the bolt and check firing pin protrusion and make sure you can wiggle the cocking piece pin. Every teardown maybe not but maybe at least every 300 rounds. It's preventive maintenance. You want to adjust the cocking piece so that when de-cocked you have about .020" clearance between the cocking piece pin shaft and the bolt body (the “A” dimension in the photo below). When assembled and in the de-cocked or fired position you should be able to wiggle the pin a little bit.
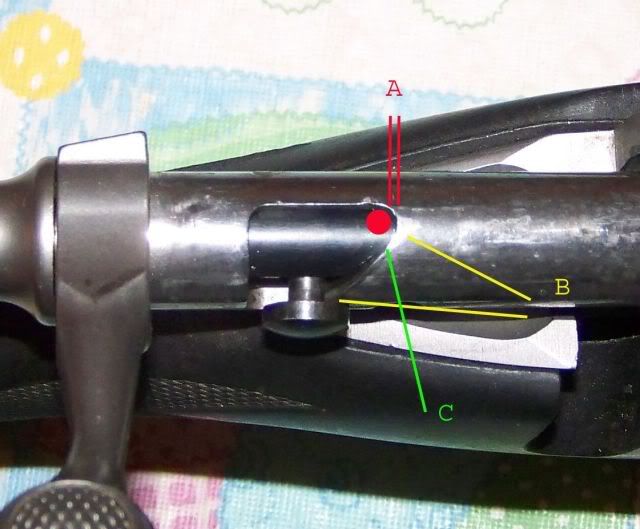
In the photo above the “B” area is called the cocking ramp, this area should be free of burrs. If the bolt is not closed all the way during firing the cocking piece pin will contact at point “C” and not enough protrusion to set off the primer.
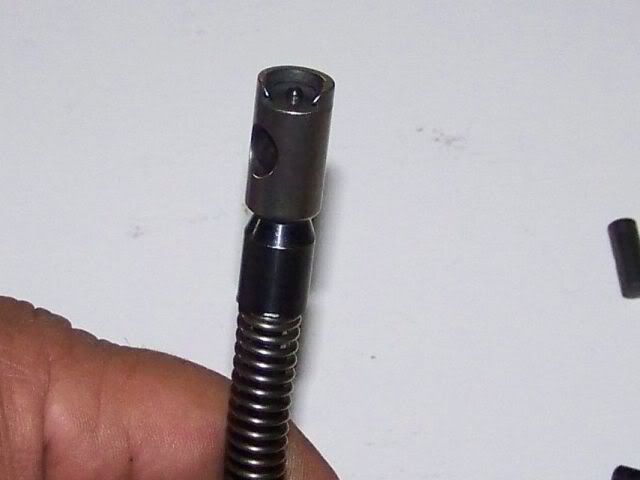
You have to align the hole in the cocking piece so that the slot in the cocking piece sleeve lines up AND engages in the slots in the cocking piece lock washer. If you look at the sleeve there is a hole at one end of the slot and "teeth" at that end of the sleeve.
You want to make sure everything lines up before inserting the firing pin assembly into the bolt body. Pay close attention that the "teeth" of the cocking piece sleeve engages the lock washer. Much like the other end the lock washer will not turn on the firing pin but the cocking piece will.
Install the bolt head and the bolt head retaining pin into the bolt body, make sure the bolt head is lined up right and the retaining pin has the hole in the right direction. Drop the firing pin in the bolt body and it should go all the way.
Insert the sleeve and line up the hole at the end of the slot with the hole in the cocking piece and insert the cocking piece pin. put the bolt handle on and start screwing the bolt assembly screw in. A small drop of blue Loctite on the threads is advisable. De-cocked you should not have any resistance till about the last 1/8-3/16".
If for some reason you have resistance before you reach this point something is wrong and you better stop and see what is wrong. Once it is snug you have to cock the firing pin before re-installing the bolt into the action. Just catch the cocking piece pin on an edge of wood (coffee table, kitchen counter, etc, etc) and push it up into the notch.
Hopefully you put the bolt head and the bolt handle on right so everything lines up right. Do a good function check and you should be ready to rock n roll.
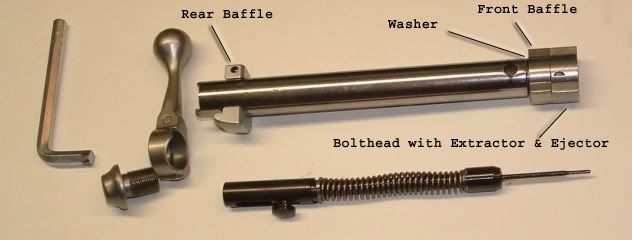
People have asked about the 10ML-I bolt. It is basically a centerfire bolt with front and rear baffles and a longer firing pin. Adjustments are the same. You do have to watch which way the bolthead is oriented since it contains the extractor and ejector.
Another question that is asked is about hotrod parts. Wolff does make heavier firing pin springs. They list the factory spring at 28lbs and have a 32 and 36lb replacement spring. I am pretty sure the ML spring is the same as the Short Action (SA) spring but not 100%. The heavier spring may decrease your lock time by a few milliseconds but it will also increase sear pressure so I would not recommend a switch to a heavier spring on a hunting rifle.
Dave Tubbs did offer his Speedlock titanium firing pin with a chrome silicon spring but IIRC it was for Long Actions (LA) only. He doesn't show the firing pin anymore (price if I remember was over $100) but still shows the CS spring for a 110 ($10.95), if it is for a LA then it will not work in a SA. Supposedly with his Speedlock system the bullet has left the bore before a stock pin/spring strikes the primer.
Bolt handles are just about a swap-out. Sharp Shooter Supply (SSS) offers the assortment. The only difference between a ML bolt handle and a CenterFire (CF) bolt handle is a small ramp on the ML bolt handle which you could add with a file. Personally we are not on a rapid fire situation and I prefer the smaller factory handle for hunting, less chance of catching it on something.

Any questions feel free to PM me or if I screwed this up tell me so I can fix it. I tried hard to make this a pretty clear how-to, I know some of you guys like a lot of pictures.
With people having misfires they sometimes blame the bolt. The most common bolt problem is not having the bolt handle all the way down. What happens then is the firing pin will not have enough travel. Another problem I have seen at least with pre-AccuTrigger Savages is trigger adjustment. If you take out all the backlash the sear can contact the trigger and slow the sear down, look at the trigger just behind the point where the sear engages and see if there is any scrapes. If so, increase backlash and see if it corrects the problem. You have to remember that the Savage firing pin is fairly light so you want nothing holding it back, even oil or grit in the bolt head.
Savage is not a fan of the shooter disassembling the bolt and does not even mention it in the owner’s manual. While not real hard I would encourage anyone that thinks that this may be too hard for them to take it to a competent gunsmith.
We will start off looking at the bolt. Notice that the notch on the bottom of the bolt handle lines up with the cocking piece pin when cocked. Also just below the cocking piece pin is the slot where the action screw is when the bolt is closed.
The open end of the horseshoe of the bolt head basically lines up with the bolt handle.
To check firing pin protrusion and/or start dis-assembly you have to de-cock the firing pin. If you have a strong thumb you can push the cocking piece pin off the notch. Make sure you finger is below the slot or you may get a good pinch. If your thumb isn't strong enough you can push it off the notch using a block of wood or plastic.
With the firing pin de-cocked we can check firing pin protrusion. You want between .050 and .070", a US dime is .050". I like to have mine on the heavy end but do not go beyond .100" as you may pierce primers. The firing pin protrusion here is at the extreme end. A dimple in the primer should be at least .040".
Lets say we have to dis-assemble the bolt, we need a 1/4" allen and it is best to put the bolt handle loosely in a vice. I have seen guys bend and break the cocking piece pin trying to loosen the bolt assembly screw while the bolt is in the action. You also do not want to tighten the vice up on the bolt body as you may deform it. At the factory I think the same gorilla they have tighten the barrel nuts also tightens the bolt assembly screw. Once we get it loose the rest is easy.
Give the bolt body a shake and the sheet metal cocking piece sleeve will be back or can be pulled back more to allow the cocking piece pin to be removed. The cocking piece sleeve has a slot with a larger diameter cut-out at the end of the slot that allows you to remove the cocking piece pin, the sleeve has to be all the way to the rear for the pin to come out.
The firing pin assembly can now be removed. The cocking piece sleeve is still on the firing pin assembly.
The bolt head retaining pin should come out with a tap or light push and then the bolt head will come out.
Now it is clean up time, get rid of all grit, sludge and GI gold. You just want to wipe down the parts with a light oil to prevent rust. If I plan on hunting in nasty freezing weather my favorite lube is a graphite based lube for lock cylinders called "Lock-Ease". Avoid heavy oils and grease. Now the firing pin assembly.
Now that everything is clean you can check the firing pin protrusion without re-assembly by just putting the bolt head on the firing pin.
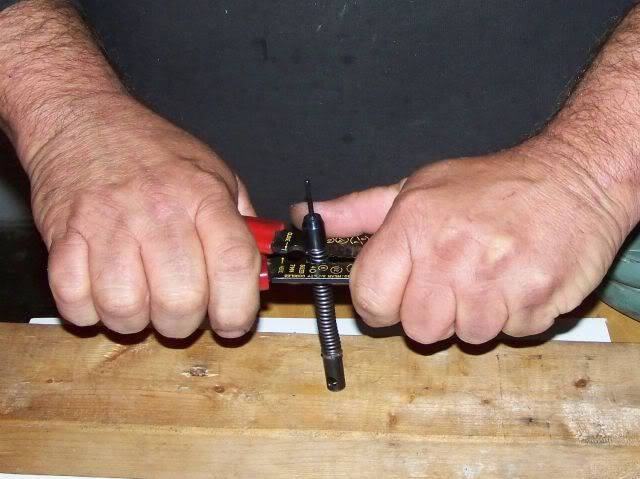
If you have to adjust the best way I found is to use a pair of wire strippers. I have one pair that is perfect that is for coax but those are at a jobsite. You want to catch the spring pretty close to the stop nut (half the distance shown in the photo), you have to watch as the firing pin is "D" shaped in that area and if you catch it to low on the flat it will stop you from pushing down. Push down on the spring and the lock washer should drop down also. Turn the stop nut clockwise to increase firing pin protrusion. Make sure the four flats on the lock washer goes back into the four slots in the stop nut, the lock washer will not turn on the firing pin. I have a jig block made that lets me do it one handed but it is hiding somewhere.
Once you have your firing pin protrusion set and the lock washer is in place we have to look at the other end. In the pre-AccuTrigger days one thing that Savage shooters did was to relieve some firing pin spring compression to ease up on sear pressure, NOT ADVISED. What happens is you have just a few threads of the firing pin (which is “D” shaped on this end also) catching in the cocking piece and those can strip dropping the firing pin and possibly causing an accidental discharge. Another one of the most common mis-adjustments is that when the bolt is de-cocked or fired, instead of the firing pin assembly coming to rest against the bolt head, it is instead being held by the cocking piece pin. I have seen with centerfires after a thousand rounds or more (aggravated by dry fire trigger practice) this causes problems due to the cocking piece pin taking the impact instead of the firing pin stop nut against the bolt head. I have seen bent/cracked/broke cocking piece pins, the cocking piece hole and the threads where it screws on to the firing pin with extreme wear, even the bolt body mushroomed. It is just a "point of inspection" during maintenance to de-cock the bolt and check firing pin protrusion and make sure you can wiggle the cocking piece pin. Every teardown maybe not but maybe at least every 300 rounds. It's preventive maintenance. You want to adjust the cocking piece so that when de-cocked you have about .020" clearance between the cocking piece pin shaft and the bolt body (the “A” dimension in the photo below). When assembled and in the de-cocked or fired position you should be able to wiggle the pin a little bit.
In the photo above the “B” area is called the cocking ramp, this area should be free of burrs. If the bolt is not closed all the way during firing the cocking piece pin will contact at point “C” and not enough protrusion to set off the primer.
You have to align the hole in the cocking piece so that the slot in the cocking piece sleeve lines up AND engages in the slots in the cocking piece lock washer. If you look at the sleeve there is a hole at one end of the slot and "teeth" at that end of the sleeve.
You want to make sure everything lines up before inserting the firing pin assembly into the bolt body. Pay close attention that the "teeth" of the cocking piece sleeve engages the lock washer. Much like the other end the lock washer will not turn on the firing pin but the cocking piece will.
Install the bolt head and the bolt head retaining pin into the bolt body, make sure the bolt head is lined up right and the retaining pin has the hole in the right direction. Drop the firing pin in the bolt body and it should go all the way.
Insert the sleeve and line up the hole at the end of the slot with the hole in the cocking piece and insert the cocking piece pin. put the bolt handle on and start screwing the bolt assembly screw in. A small drop of blue Loctite on the threads is advisable. De-cocked you should not have any resistance till about the last 1/8-3/16".
If for some reason you have resistance before you reach this point something is wrong and you better stop and see what is wrong. Once it is snug you have to cock the firing pin before re-installing the bolt into the action. Just catch the cocking piece pin on an edge of wood (coffee table, kitchen counter, etc, etc) and push it up into the notch.
Hopefully you put the bolt head and the bolt handle on right so everything lines up right. Do a good function check and you should be ready to rock n roll.
People have asked about the 10ML-I bolt. It is basically a centerfire bolt with front and rear baffles and a longer firing pin. Adjustments are the same. You do have to watch which way the bolthead is oriented since it contains the extractor and ejector.
Another question that is asked is about hotrod parts. Wolff does make heavier firing pin springs. They list the factory spring at 28lbs and have a 32 and 36lb replacement spring. I am pretty sure the ML spring is the same as the Short Action (SA) spring but not 100%. The heavier spring may decrease your lock time by a few milliseconds but it will also increase sear pressure so I would not recommend a switch to a heavier spring on a hunting rifle.
Dave Tubbs did offer his Speedlock titanium firing pin with a chrome silicon spring but IIRC it was for Long Actions (LA) only. He doesn't show the firing pin anymore (price if I remember was over $100) but still shows the CS spring for a 110 ($10.95), if it is for a LA then it will not work in a SA. Supposedly with his Speedlock system the bullet has left the bore before a stock pin/spring strikes the primer.
Bolt handles are just about a swap-out. Sharp Shooter Supply (SSS) offers the assortment. The only difference between a ML bolt handle and a CenterFire (CF) bolt handle is a small ramp on the ML bolt handle which you could add with a file. Personally we are not on a rapid fire situation and I prefer the smaller factory handle for hunting, less chance of catching it on something.
Any questions feel free to PM me or if I screwed this up tell me so I can fix it. I tried hard to make this a pretty clear how-to, I know some of you guys like a lot of pictures.