Post by Tenbears on Sept 1, 2004 9:53:34 GMT -5
I will explain the process for mounting a deer shoulder mount In a series of posts. I would suggest waiting untill the series is complete befor beginning.
I will be happy to answer any specific question.
I have explained how to skin the hide off the skull in the thread "Any taxidermists out there." So I will continue from that point. Before we start we need to take some measurements A from tip of the nose to the front corner of the eye. B. Circumference around the neck just behind the ears.
For those who are beginning, and may not have the time to do the hide all at one time. it is acceptable to place the hide in a plastic bag and freeze after skinning until you have time to turn the hide. it is recommended that the hide be frozen flat. this allows the cape to thaw rapidly, and evenly,
Turning the hide is the most tedious part of the job. One will be working with skin no thicker than a sheet of paper. So care must be taken not to make excessive cuts of the hide, or one's fingers.
I start with the lips. from the inner lip skin where it has been cut from the gum line. using a scalpel, or exacto Knife I begin cutting the lip skin away from the flesh about 1/2 inch from the corner of the mouth on the upper lip. and work around to the same spot on the other side. work carefully down to just beyond where the hair starts on the lips transition from inner to outer and stop. Then go to the nose. here we cut the skin about 1/2" inside each nostril making sure to cut only the skin, and not the cartilage then peal the skin off the cartilage trimming carefully with the scalpel in any tough areas. Until all the cartilage is removed. Now split the flesh between the nostrils to the nose pad.
With a finger in a nostril, trim all flesh, and tendon from the center of the pad. To the nostril and repeat on other nostril. Then go to the corner of the mouth and flesh toward the nostril making sure not to cut the whisker follicles.
Next I do the bottom lip, Starting 1/2" from the corner of the mouth and working around to the same spot on the other side. Work carefully at the front. This is a delicate area. and must be split to the edge. Then flesh from the center of the lower lip outward to where the lip makes the transition to hair.
Now the corners of the mouth are split. work from the hair portion outward to the edge of the lip, removing all the flesh.
Our next step is the eyes. Start from where the inner eye lid has been cut off. and work toward the eye opening. Be careful NOT to cut the follicles of the wishers around the eyes. flesh closely to the Meibomian Glands. These will appear as yellow lines at the point where the eyelid makes the transition from inner to outer. Carefully cut the glands off Be very careful Here the skin is no thicker than tissue paper. then flesh the inner eyelid. Leaving about 1/4" of inner lid.
The ears must be turned. And the cartilage removed. Begin inverting the ear from the back side by cutting the membrane as you pass the fleshy area, begin to cut membrane from cartilage staying close to the cartilage. Then with your finger. Separate skin from cartilage all the way up the back of the ear. Be careful at the ear edge. It is easy to poke your finger through. and invert the ear. For the beginner removing the flesh from the cartilage will make things easier to see. Cut the cartilage 1/2 inch below the ear opening, and across where it drops inward. Fold the ear across the center. and cut through the cartilage along the fold. Cut only the cartilage. Peal the two sections from the inner ear skin. Again the skin here is tissue paper thin. so work carefully.
Flesh the entire hide to remove as mush membrane as possible.
At this point the hide is ready to be salted. Or frozen. If you have taken a long time to get this done, and intend to refreeze. I would recommend applying Stop rot to the hide before freezing.
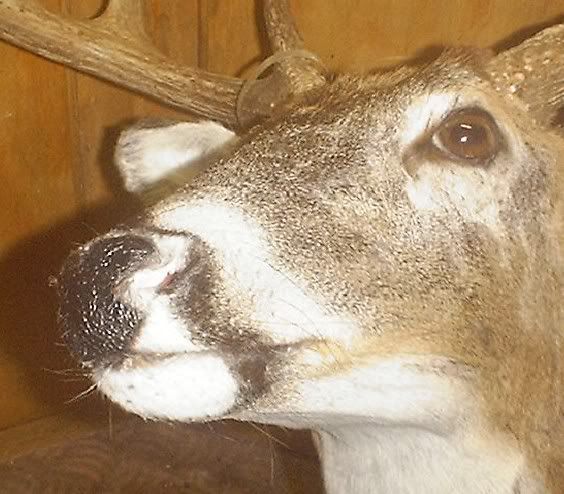
Lips and nostrils turned.

I will be happy to answer any specific question.
I have explained how to skin the hide off the skull in the thread "Any taxidermists out there." So I will continue from that point. Before we start we need to take some measurements A from tip of the nose to the front corner of the eye. B. Circumference around the neck just behind the ears.
For those who are beginning, and may not have the time to do the hide all at one time. it is acceptable to place the hide in a plastic bag and freeze after skinning until you have time to turn the hide. it is recommended that the hide be frozen flat. this allows the cape to thaw rapidly, and evenly,
Turning the hide is the most tedious part of the job. One will be working with skin no thicker than a sheet of paper. So care must be taken not to make excessive cuts of the hide, or one's fingers.
I start with the lips. from the inner lip skin where it has been cut from the gum line. using a scalpel, or exacto Knife I begin cutting the lip skin away from the flesh about 1/2 inch from the corner of the mouth on the upper lip. and work around to the same spot on the other side. work carefully down to just beyond where the hair starts on the lips transition from inner to outer and stop. Then go to the nose. here we cut the skin about 1/2" inside each nostril making sure to cut only the skin, and not the cartilage then peal the skin off the cartilage trimming carefully with the scalpel in any tough areas. Until all the cartilage is removed. Now split the flesh between the nostrils to the nose pad.
With a finger in a nostril, trim all flesh, and tendon from the center of the pad. To the nostril and repeat on other nostril. Then go to the corner of the mouth and flesh toward the nostril making sure not to cut the whisker follicles.
Next I do the bottom lip, Starting 1/2" from the corner of the mouth and working around to the same spot on the other side. Work carefully at the front. This is a delicate area. and must be split to the edge. Then flesh from the center of the lower lip outward to where the lip makes the transition to hair.
Now the corners of the mouth are split. work from the hair portion outward to the edge of the lip, removing all the flesh.
Our next step is the eyes. Start from where the inner eye lid has been cut off. and work toward the eye opening. Be careful NOT to cut the follicles of the wishers around the eyes. flesh closely to the Meibomian Glands. These will appear as yellow lines at the point where the eyelid makes the transition from inner to outer. Carefully cut the glands off Be very careful Here the skin is no thicker than tissue paper. then flesh the inner eyelid. Leaving about 1/4" of inner lid.
The ears must be turned. And the cartilage removed. Begin inverting the ear from the back side by cutting the membrane as you pass the fleshy area, begin to cut membrane from cartilage staying close to the cartilage. Then with your finger. Separate skin from cartilage all the way up the back of the ear. Be careful at the ear edge. It is easy to poke your finger through. and invert the ear. For the beginner removing the flesh from the cartilage will make things easier to see. Cut the cartilage 1/2 inch below the ear opening, and across where it drops inward. Fold the ear across the center. and cut through the cartilage along the fold. Cut only the cartilage. Peal the two sections from the inner ear skin. Again the skin here is tissue paper thin. so work carefully.
Flesh the entire hide to remove as mush membrane as possible.
At this point the hide is ready to be salted. Or frozen. If you have taken a long time to get this done, and intend to refreeze. I would recommend applying Stop rot to the hide before freezing.
Lips and nostrils turned.